In this blog I’ll talk about creating the first SAPUI5 Hello World project to get a basic understanding of the structure of an SAPUI5 application. This application will not display a simple Hello World text, it would do a bit more than that. So let’s get going.
The code for
index.html has been updated to fix a runtime error.
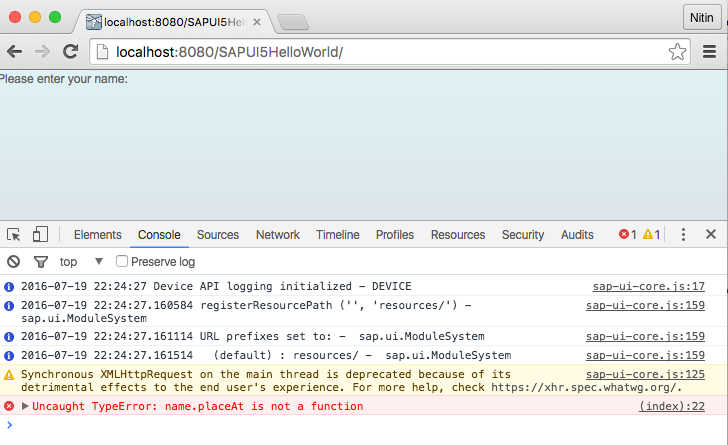
Apparently, the variable name is a reserved keyword in SAPUI5. This was preventing the input field for name to show up on the page. The source code zip file has also been updated with the change. This provides a solution to all the problems reported by users in their comments below.
Prerequisites
Create an Application Project for SAPUI5
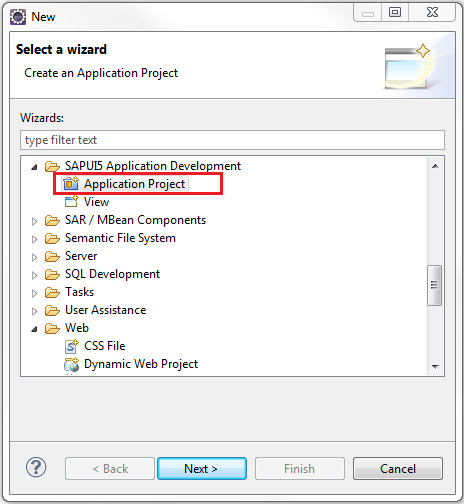
Open Eclipse and go to the menu option, File -> New -> Other…. In the New window, open the node SAPUI5 Application Development and select the option Application Project. Click on the Next button.
Provide a name to the project. Let’s call it SAPUI5HelloWorld. Select the library sap.ui.commons and uncheck the option Create an Initial View. Click on the Finish button to create the project.

The library
sap.m is used for developing SAPUI5 mobile applications and the option Create an Initial View is used to develop SAPUI5 applications based on the Model-View-Controller (MVC) design pattern. I’ll talk about them in my later blogs.
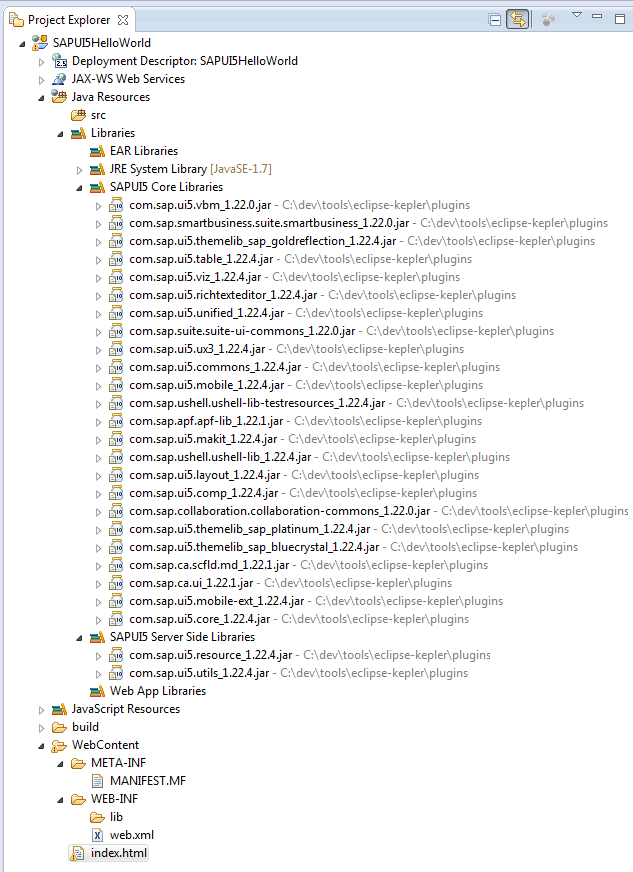
A project structure similar to the one shown below should be created
Locate and open the index.html file. Now, it is important to understand that an SAPUI5 application is executed in a client-side browser window. The user interface is written programmatically by calling JavaScript APIs provided by SAPUI5 jar files. Therefore all user interface controls like buttons, textbox, label etc. are created dynamically when such a page is loaded in a browser. Going by this logic, the JavaScript code for generating user interface controls is placed within the <script></script> tags which will generate the user interface dynamically in the <body></body> tag area.

Write User Interface Logic
After creating the project structure, the next step is to write code which will generate the user interface dynamically. Copy the code below and paste it in your index.html file.
<!DOCTYPE HTML>
<html>
<head>
<meta http-equiv="X-UA-Compatible" content="IE=edge">
<meta http-equiv='Content-Type' content='text/html;charset=UTF-8' />


<script src="resources/sap-ui-core.js" id="sap-ui-bootstrap"
	data-sap-ui-libs="sap.ui.commons" data-sap-ui-theme="sap_bluecrystal">

</script>
<!-- add sap.ui.table,sap.ui.ux3 and/or other libraries to 'data-sap-ui-libs' if required -->

<script>
	// Create a label
	var lblName = new sap.ui.commons.Label();
	lblName.setText("Please enter your name:");
	lblName.placeAt("content");

	// Create an text field
	var txtName = new sap.ui.commons.TextField("txtName");
	txtName.placeAt("content");

	// Create a button to submit the name
	var submitButton = new sap.ui.commons.Button("btnSubmitName");
	submitButton.setText("Submit");

	// Attach an action to the above button
	submitButton.attachPress(sayHelloFunction);
	submitButton.placeAt("content");

	// Functions
	function sayHelloFunction()
        {
		alert("Hello " + txtName.getValue());
	};
</script>

</head>
<body class="sapUiBody" role="application">
	<div id="content"></div>
</body>
</html>
The JavaScript code within the <script></script> tags would create and place the following UI controls in the <body></body> tag area.
- A Label of the type
sap.ui.commons.Label - A Text Field of the type
sap.ui.commons.TextField - A Button of the type
sap.ui.commons.Button
and it would then attach the custom JavaScript function called sayHelloFunction() to the press event of the sap.ui.commons.Button control.
Deploy Application Project for SAPUI5
The SAPUI5 application project is inherently a web application which can be deployed as a Web Archive (WAR) on any web container or application server.
Start your server and deploy the application. Then open the following URL in browser http://localhost:8080/SAPUI5HelloWorld/index.html
Please use the port number according to your server configuration.
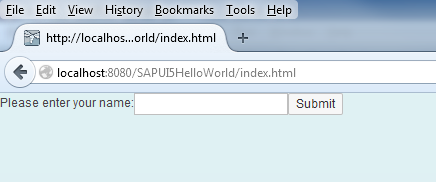
Type-in a name in the textbox and click on the Submit button. An alert box should be displayed.

Congratulations!!! You’ve created your first SAPUI5 application. For your reference, the project is attached below. See you in the next blog!
Hi Ravi, I’ve updated the blog with a code fix in
index.html. This should solve your problem. Thanks!i creatd code in index.html file but nothing is displaying in chrome and also not in eclipse builtin browser. Please help.
Thanks
rename field “name” to “nameField” and you’re done. Apparently “name” is reserved.
// Create an text field
var nameField = new sap.ui.commons.TextField(“txtName”);
nameField.placeAt(“content”);
…
// Functions
function sayHelloFunction()
{
alert(“Hello ” + nameField.getValue());
};
hi there,
I had tried the same code but in my google chrome the submit button and input field is not displaying. But in my eclipse it is showing perfectly.