This blog is all about understanding the execution order of SAPUI5 view controller lifecycle methods. Lifecycle methods are auto generated in a view and controller whenever a new view is created. I’ll demonstrate the execution order of these lifecycle methods through a program.
Prerequisites
Create an Application Project for SAPUI5
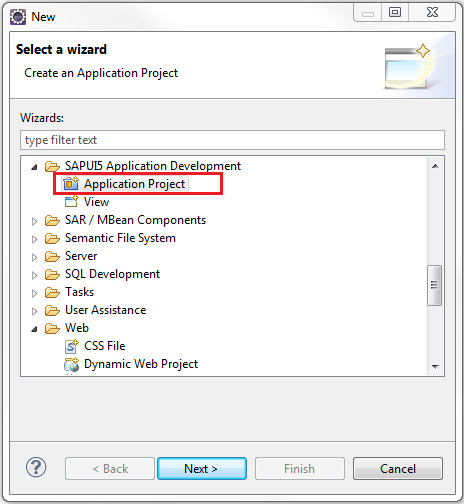
Open Eclipse and go to the menu option, File -> New -> Other…. In the New window, open the node SAPUI5 Application Development and select the option Application Project. Click on the Next button.
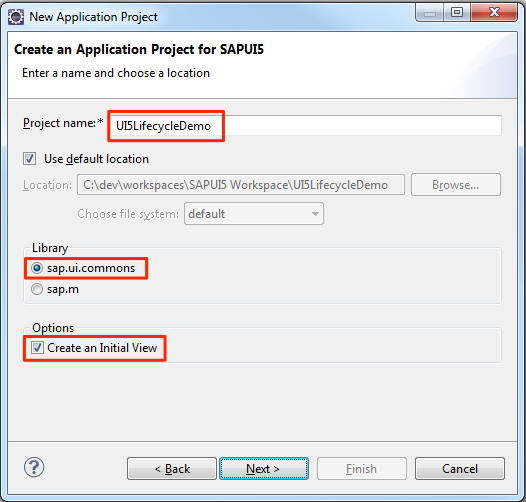
Provide a name to the project. Let’s call it UI5LifecycleDemo. Select the library sap.ui.commons and check the option Create an Initial View. Click on the Next button.
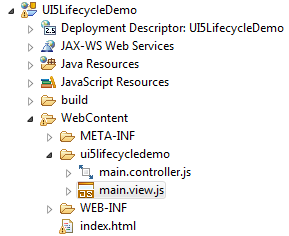
In the next window, provide a name to the view. Let’s call it main. Select the Development Paradigm as JavaScript. This will create a view in JavaScript. Click on the Finish button.

A project structure similar to the one shown below should be created
Write View Logic
Open the main.view.js file and write the following code into the body of createContent method.
sap.ui.jsview("ui5lifecycledemo.main", {

	/** Specifies the Controller belonging to this View.
	* In the case that it is not implemented, or that "null" is returned,
        * this View does not have a Controller.
	* @memberOf ui5lifecycledemo.main
	*/
	getControllerName : function() {
		return "ui5lifecycledemo.main";
	},

	/** Is initially called once after the Controller has been instantiated.
        * It is the place where the UI is constructed.
	* Since the Controller is given to this method, its event handlers can
        * be attached right away.
	* @memberOf ui5lifecycledemo.main
	*/
	createContent : function(oController) {

		console.log("createContent() of main view called...");

		// Create a Panel object
		var mainPanel = new sap.ui.commons.Panel("mainPanel");

		// Create a Button object
		var exitButton = new sap.ui.commons.Button({
			id : "exitButton", // sap.ui.core.ID
			text : 'Exit and kill controller', // string
			press : [ function(oEvent) {

				// Commit suicide
				this.destroy();

				// Let the world know about it
				alert("View and Controller destroyed...");

			}, this ]
		});

		// Add the button to the main panel
		mainPanel.addContent(exitButton);

		return mainPanel;
	}

});
Write Controller Logic
Open the main.controller.js file. Uncomment all the hook methods; onInit, onBeforeRendering, onAfterRendering and onExit of the controller and write the following code into the body of all the methods.
sap.ui.controller("ui5lifecycledemo.main", {

/**
* Called when a controller is instantiated and its View controls (if available)
* are already created.
* Can be used to modify the View before it is displayed, to bind event handlers
* and do other one-time initialization.
* @memberOf ui5lifecycledemo.main
*/
	onInit: function() {

		console.log("onInit() of controller called...");
	},

/**
* Similar to onAfterRendering, but this hook is invoked before the controller's
* View is re-rendered
* (NOT before the first rendering! onInit() is used for that one!).
* @memberOf ui5lifecycledemo.main
*/
	onBeforeRendering: function() {

		console.log("onBeforeRendering() of controller called...");
	},

/**
* Called when the View has been rendered (so its HTML is part of the document).
* Post-rendering manipulations of the HTML could be done here.
* This hook is the same one that SAPUI5 controls get after being rendered.
* @memberOf ui5lifecycledemo.main
*/
	onAfterRendering: function() {

		console.log("onAfterRendering() of controller called...");
	},

/**
* Called when the Controller is destroyed. Use this one to free resources
* and finalize activities.
* @memberOf ui5lifecycledemo.main
*/
	onExit: function() {

		console.log("onExit() of controller called...");
	}
});
Deploy and Run Application
Start your server and deploy the application. Open a new browser window (this example uses the Chrome browser) and open the Developer Tools

Then open the following URL in browser http://localhost:8088/UI5LifecycleDemo/index.html
Please use the port number according to your server configuration.

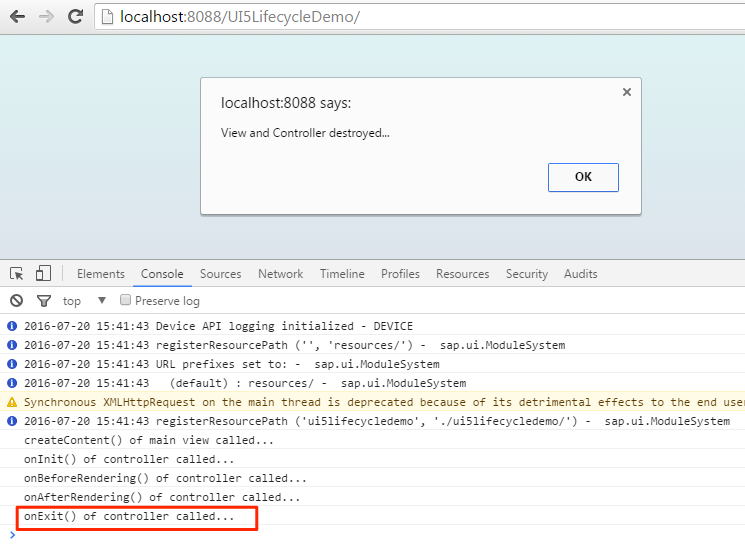
Loading the index.html will print the logs in the Developer Tools console. You can see that the createContent() method of the view is called first followed by the onInit(), onBeforeRendering() and finally the onAfterRendering() methods of the controller. The purpose of these methods is very well documented in the comments above them. I am therefore not discussing their purpose in detail.
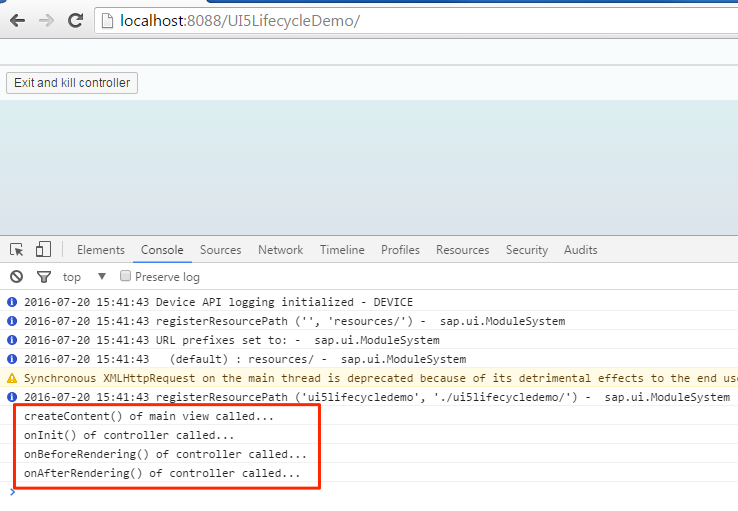
Now, click on the Exit and kill controller button. This will call the destroy() method on the view. The destroy() method cleans up all the resources associated with the view and its child elements. Therefore, the controller associated with the view is also destroyed and hence its onExit() method is called.
I hope this helps to better understand the flow of execution of SAPUI5 view controller lifecycle methods. See you in the next blog!
Hi Nitin,
If we do not invoke onExit() manually, when this onExit() will be executed?
If we write some code inside Controller’s onExit(), that will be executed either on Page refresh OR Closing of Tab/Page?
Thanks,
Srinath